|
Farm Arts & Crafts Ideas
Hey Diddle Diddle
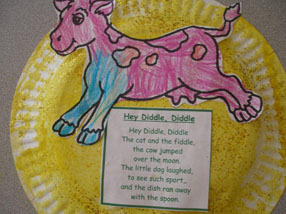
(Photo submitted by Nanette)
To create the moon, have each child paint a
paper plate with yellow paint.
While that is drying, have children color a cow pattern.
Once the paint is dry, children can glue their cow and a print out
of the Hey Diddle Diddle nursery rhyme to their moon.
Tractor Shape Art
Use pre cut shapes or have children
cut out two circle wheels, one rectangle,
one square and one triangle for the tractor. Primary colors look best or
you can use
black for the wheels. This is a great activity to work on the name of
shapes and colors!
Barn
Create a
barn from a large appliance box! To begin, cut a door, windows,
and a hayloft opening in the box. Paint and decorate the box to
resemble a barn.
To add to the fun, provide toy farm animals,
riding toy tractors, toy trucks, etc.
Sponge Paint Chicks
Cut small
and large sponge circles and orange and black construction paper
scraps. On white paper, have the children sponge paint a large circle.
Above this
circle the have them sponge paint a smaller circle.
After the
paint dries, add eyes, beak and other features with
construction
paper scraps. Cut out the yellow chicks if desired.
Pom Pom Chicks
Have each child
create a yellow chick by gluing together two yellow pom poms
or
cotton balls and then add wiggly eyes and a construction paper
beak.
Chicken Feathers
Ran off copies of
chickens on construction paper.
Encourage the children to cut them
out and glue feathers on.
Milk Jug Chicks
Cut the spout off a
gallon-sized yellow milk jug, leaving the handle in tact.
Glue on
two large wiggle eyes, as well as wings, feet, and a beak cut from
orange felt.
Add a dab of glue and a couple of orange craft
feathers to finish off this charming chick.
Which Came First - The Chicken or the
Egg?
An age old question
leads to a delightful art project. Let the children choose what
they
want to make first...the chicken or the egg. To make the
chicken, encourage the
children to draw two circles, one for the
head and one for the body. Add a beak, an
eye and a wing. You
may want to use colored construction paper and cut and paste,
or
you may decide to use white paper and crayons or markers. There
is no need to
make feet because the chicken will be in the egg.
To make the egg, encourage
the children to draw a very large egg
shape. Make sure the egg is bigger than the chicken.
Draw a zig
zag "crack" line across the middle of the egg. Decorate the egg
with markers or crayons.
Baby Chicks
Give each child one
egg cup cut from an egg carton and two cotton balls.
Put a
mixture of baby powder and yellow powdered tempera paint into a
plastic bag.
Allow each child to place two cotton balls in the
baggie and shake for a minute or two.
Then carefully take them
out of the baggie, and gently tap the extra powder off.
Have your
child glue their cotton balls in their egg cups, one on top of the
other then let
them add a orange construction paper beak, and
wiggly or black construction paper eyes.
Rooster Mask
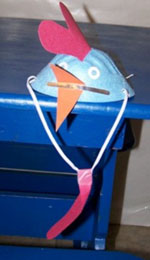
(Photo submitted by Tricia)
I used disposable
dust/face mask to make roosters.
You will have to forgive my
description...I cannot figure out a way to word what we did to
make it easy for you to understand. I attached a photo though. We
cut long diamonds
for the beaks and placed them in the little
metal nose clip thingy. Then we cut a small
slit on the top and
put the roosters comb in it and taped to the inside so it would
stand up.
Then the kids placed two hole reinforcements on for eyes
and a long piece of red paper
to the strap for the neck. Once
completed, the kids wore them on their heads.
Cows Eat Grass
Cut out cow shapes.
Explain to the children that cows like to eat grass.
Go outside and have your kids pick some blades of grass.
Have them glue the cows, and the blades of grass onto a piece of
blue paper.
Have available bingo dabbers for them to paint spots on their cows
if they desire.
Spotted Cows
Ahead of time, cut
sponges into chunks. Clip each chunk into a spring-type
clothespin.
Pour Black paint into shallow dishes. Paint cow spots on large
sheets of paper.
Jersey Cows
Large paper cow
shapes, black tissue paper cut into rounded edge shapes,
watered-down glue, sponge brushes. Children attach the black
tissue paper
onto the cow shape by wetting with the glue solution on the
sponge brush.
Condensed Milk Painting
Add a few drops of
food coloring into shallow bowls of sweetened condensed
milk and let children paint with Q-Tips. It will dry vibrant and
shiny!
Allow several days for the paint to dry.
Utter Painting
Beforehand, make a
cow using a sawhorse, fabric, duct tape and newspaper.
Throw a large pc. of "cow colored" fabric over the sawhorse for
the cow's body,
then form the cows head using the duct tape and newspaper. You
can either paint it
or attach more fabric to the head. Once the cow is complete, you
will need a latex glove
with tiny holes in each finger of the glove. Attach the glove to
one of the side
bars of the saw horse and let the children "milk the cow" with a
sheet of
construction paper below to create an utter painting.
Paper Plate Cows
Sponge paint black
spots onto the paper plate. Add
construction paper ears, nose, and mouth, and eyes ( or wiggly
eyes).
Cow Pictures
Make cow profiles
and cut out for each child.
Let them sponge the black spots on the cows. Then decorate the
faces.
Farm Animal Puppets
For our farm unit I
have the children make masks out of paper plates.
We paint the plates and add ears and mouths, then cut out the
eyes.
For example ...
THE HORSE: would be a brown plate with brown construction
paper ears and
some yarn on top for the mane and you can even use some paper to
make
a mouth that sticks out and add teeth.
THE PIG:
would be a pink plate, pink ears, egg carton section for nose.
THE COW:
would be a white plate with black sponge
paint spots and black construction paper ears.
THE DUCK:
would be a yellow plate, add some feathers etc.
When we are done
decorating we hot glue a tongue depressor to the bottom.
We then sing Old McDonald and each animal stands up when we sing
about them.
Blue Ribbon Cows
Provide each child
with a poster board cow, crayons, markers, and scissors.
Have children decorate and cut out their cow patterns. Then cut
out
a blue construction paper ribbon to attach to each child's cow.
Cow Sock Puppet
Each child will need
a clean tube sock, markers, glue, scissors, an oval felt muzzle,
two horns, and two ears to make a cow sock puppet. Help each
child glue the felt
muzzle, horns, and ears to the sock. Have children add eyes and
spots with a maker.
Duck Pond
Paint a paper plate
blue for the pond. Decorate a small duck outline with
pieces of yellow tissue paper. Glue onto a popsicle stick. Cut a
slit in the
plate bottom. Insert duck. You can decorate the plate with green
crinkle
paper grass, small flowers for lilly pads, etc.
Feather Painting
Use feathers to
paint a duck picture or duck cut-out.
Feathered Duck
Easel paint a duck shape yellow and glue on yellow
or white feathers. Ask the child the
name of the duck and any
other desired information, and dictate word for word onto the
paper.
Hands & Foot Duck
Use cut-outs of
children's hands and one foot to make a duck.
Hands=wings, foot=body. Add beak, webbed feet, and eyes.
Duck Finger Puppet
For each child cut
out a duck finger puppet shape. Cut along the dotted lines
and fold back the tabs to make wings. Cut eye shapes out of black
construction
paper or use wiggly eyes and cut bill shapes out of orange
construction paper.
Let the children glue the eyes and bills on their duck puppets.
Then bend and tape the tabs together on each child's puppet to
complete.
Thumbprint Duck
I printed out a
shape of a duck. They thumb printed the beak and the feet
then they glue white feathers on the body then a black button for
the eye
Duck Sock Puppet
Each child will need
a clean tube sock, markers, glue, scissors, and an orange felt
duck bill to make a duck sock puppet. Help each child glue the
felt bill to the sock.
Have children add eyes and nostrils with a marker.
My Very Own Duck
Invite the children
to draw a simple picture of a duck.
Help the children make up a name for their ducks, such as Ducky
Douglas.
Ducks On A Pond
Provide each child
with a sheet of green construction paper, a blue construction
paper
pond cutout, duck, and duckling patterns, crayons, markers,
scissors, and glue.
Have children color, cut out, and glue the pond patterns to a
sheet of green construction
paper. Cut and fold yellow or white construction paper
rectangles in half to form tents.
Have each child glue a duck or duckling pattern to a tent with
the fold at the top.
Help children cut out their ducks to place on their ponds.
Horsing Around
Have a hankering for some horseplay? Then make your own stick
horses for frolicking
around the farmstead. To make one stick,
roll a sheet of newspaper diagonally; then
tape it together. For
the horse's head, cut two horse-head shapes from heavy tagboard.
(Use a favorite pattern, if desired) Place the two heads back to
back. Then insert the
newspaper stick between the two heads and
staple them together. Invite youngsters
to paint their sticks and
color the faces on their horse heads. Then get ready to ride!
Variation: Make simple hobby horses by stuffing any kind of socks
(except tube socks)
with cloth or newspaper and fastening them
around the ends of a yardstick with rubber bands.
If desired, sew
on button eyes and glue on yarn hair.
Let the children ride the
hobby horses outside or around the room.
Mini Stick Horses
One old sock per child. Yarn for mane. Felt for features. 12 inch
sticks. Paper Towels. Let each
child stuff its sock with paper towels. Then decorate. Insert stick fasten
with yarn or rubber band.
Pinecone Pony
To make the pony's body. glue the ends of four straight twig legs
to a medium-size pinecone.
For a head and neck, glue a small
pinecone to the end of a pine needle-covered twig and trim
the
needles to create a spiky mane. Then, glue the base of the neck to
the body.
Lastly, glue a thick bunch of pine needles to
the back of the body for a flowing tail.
My Horses Mane
Draw a profile of the face & neck of a horse. Let the
children
color and glue on yarn hair to the mane.
Horseshoe Prints
Cut sponges in the shape of horseshoes and encourage
the children
to sponge paint horseshoes all over their paper.
Horse Finger Puppet
Make hole large enough for a finger in the side of paper or
Styrofoam cup. Lay cup on side with
hole down. Glue on
construction paper ears, ribbon bridle, felt-tip marker for eyes,
nose, mouth.
Paper Bag Horse Puppets
Materials Needed:
A simple-to-cut large horse head
Small brown paper bags
Water colors or crayons
Directions:
Children water paint the horse head brown, cut out and glue to the
bottom of the paper bag.
Galloping Paint
Allow the plastic horses to gallop through paint and across the
paper.
Hand Horses
Materials Needed:
Brown paint, paper, brown marker
Directions:
Take brown paint and paint a child's hand. Then press the
hand down on paper
and with fingers pointing down. The fingers are the legs and the
thumb is the head.
Draw the mane and hooves and eyes and tail and you have handprint
horses.
You can also use yarn for the mane and tail... glue on after
painting has dried.
Horse Tails
Tie several strands of course hair (horse hair if you can get it)
onto a
craft stick. Encourage the children to experiment with this as a
paintbrush.
Horseshoe Sponge Printing
Cut horseshoe shapes from sponges. Allow the children to dip
sponges in the colors of paint they
choose. Encourage the children to print the horseshoe several times
to make patterns or designs.
Paper Plate Pig Faces
Have the
children paint a paper plate pink and let dry. Once it is
completely dry,
have the children glue on eyes, pink cupcake liner
for nose and cut pink
construction paper ears. A mouth can be
drawn with a marker.
Muddy Pigs
Cut out a good pig
pattern. Let the children paint the pigs pink. Once the pink
paint has dried, let them finger paint brown "mud" paint onto the
pig's body.
Variation: Instead of using brown
tempera paint for the "mud",
let your children finger paint with
chocolate pudding. YUMMMMM!.
Variation: Run off copies of a pig on to large pink construction
paper, and you or the kids
(if they can), cut them out. Give each
child a small cup of shaving cream, add a few drops
of brown paint
and let them mix it
up. Then have them paint their pink pig with "mud".
Thumb Print Piggies
Have children put pink thumbprints on a piece of
construction
paper and make
the prints into pigs.
Cotton Ball Sheep
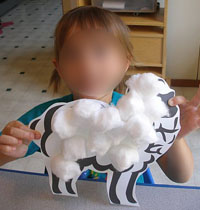
(Photo submitted by Nanette)
Find a good sheep
pattern and copy the pattern on heavy paper.
Have the children practice their cutting skills by cutting out
sheep.
Color sheep gray if desired. When finished, let the children
glue
cotton balls to the body of the sheep.
Handprint Sheep
Trace each child's handprint onto black paper
with a white piece of chalk.
Cut out handprint. Fingers make the legs & thumb makes the
neck and face.
Then cover the body with cotton balls.
Sheep Ears
Cut two black floppy
ears from construction paper.
Measure the child's head for a headband made from white paper.
Have the children decorate the head band with cotton balls and
glue.
Next attach the black floppy ears.
Little Lamb
Glue Small plastic
cup, a L'eggs panty hose egg, or a plastic deli container Large
bag cotton balls,
Four miniature spring-action clothespins, Paintbrush and white
paint, Black marker Black
pom-pom (available at craft stores) Black felt, and wiggly eyes.
Spread glue all over the cup and cover
it with a coat of cotton balls. Paint four clothespins white and
color the bottom tips (the part you squeeze)
with black marker. Clip clothespins at even intervals around the
bottom of the cup to form legs.
Glue a black pom-pom into position as the head, then glue on two
ears cut from black felt.
Attach wiggly eyes to the head--and don't forget to add one last
cotton ball as a fluffy tail.
Sheep Sock Puppet
Give each child a
clean tube sock, markers, cotton balls, glue, scissors,
and two felt oval ears to make a sheep sock puppet. Have each
child glue the felt ears
and cotton balls to the sock. Have the children add the eyes and
a muzzle with a marker.
Woolly Lambs
Cut 6" ovals out of
poster board for body, then a 2" for head.
Encourage the children to glue head on to body. Next, have the
children glue cotton
balls on to the lamb. Then, glue wiggly eyes on and put clothes
pins on for legs.
They should be able to stand up on their own.
Baa Baa Black Sheep Puppets
Give each child a
cutout of a sheep. Give them cotton balls and glue. Show them how
to pull
the cotton balls apart and glue them to the sheep. Give them a
craft eye or button to glue on also.
You could also color the cotton balls with black tempera paint
before hand and glue finished
sheep to popsicle stick to use while singing baa baa black sheep.
Oatmeal Wool Sheep
Use a cutout of a
sheep and glue onto a paper plate. Spread glue onto
the sheep's body and let the children put on the "wool" using dry
oatmeal.
Black Sheep / Striped Sheep
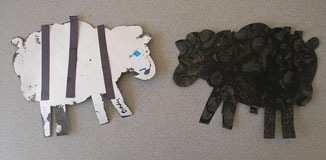
(Photo submitted by Nanette)
Baa Baa Black Sheep
Baa, Baa, black sheep, have you any wool?
Yes
sir, yes sir - three bags full:
One for the master, one for the
dame,
And one for the little boy that lives down the lane.
Baa, Baa, black sheep, have you any wool?
Yes
sir, yes sir - three bags full.
Baa, Baa, Striped Sheep
Baa, Baa, striped sheep, have you any wool?
No
sir, no sir - No bags full:
None for the master, none for the
dame,
And none for the little boy that lives down the lane.
Striped sheep, why sheep, have you no more wool?
Oh sir, because sir - *pause* I'm a zebra!
Magnetic Lamb
Paint elbow pasta
white, I put paint into a plastic cool whip container and add two
or
three handfuls so pasta and paint and have the children shake
until the past is covered.
Cut a three inch circle from heavy cardboard/ poster board and 1
1/2
inch circle from black foam or black poster board , for the head.
Glue pasta on white circle, glue black circle to the body and glue
white cotton balls
on top of the heard , glue on eyes ears and feet out of felt or
any other black material.
Place a magnetic strip on the back and your lamb is complete.
Collage Lamb
You could make lambs
out of black construction paper and a variety of different white
textured materials. Trace a basic lamb shape onto black paper
with crayon
or chalk and have the children cut them out and glue white
material to them
Popcorn Sheep
Draw a picture of a
sheep. Pop popcorn in front of the children and then they can glue
it onto the sheep.
Chenille Wire Lambs
You can make a very
simple lamb using a piece of white chenille wire and cotton
batting.
From a roll of cotton batting about 3 inches in length and 1 1/2
inches thick.
Twist half of the wire around the roll, about 3/4 inch from one
end to make the head and front legs.
Twist the other half of the wire around the other end of the
roll of cotton about 1/2 inch from the end
to form the back legs. Pinch and roll tiny bits of cotton to form
two ears and the tail.
Eyes and nose may be drawn onto the cotton with a black felt tip
marker.
Black Sheep
Cut out sheep
designs out of white construction paper.
Let your children glue black yarn onto the paper or let them use
a black crayon to color the sheep.
Sheep Sheared Before and
After Photo
Materials Needed:
Black paper,
folded in half,
chalk or white crayon,
cotton and some glue
Procedure:
Cut out sheep shapes out of folded paper (like a card).
Have the children color the inside of the card with the
chalk/crayon. Label this side AFTER.
On front of the card, have the children glue the cotton to the
sheep. Label this side BEFORE.
Corn Cob Printing
Let your children use a clean, stripped, dried corn cob
as a brush or roll the
cob in paint and onto a piece of paper.
Corn Cob Picture
We eat lots of corn on the cob
during the summer months. I also freeze a lot.
One great thing I do is save my cobs. I let them get very dry after I cut
all the
kernels off the cob. We use these during class time to roll in paint and
to paint with.
We also make a corn cob picture. We glue our cobs to a sheet of paper, let
it dry.
We then use popcorn and glue it to our cob. We add green
construction paper as the
corn husks and sometimes yarn as the silk. We have even popped some
of the popcorn and let the children glue it around their finished corn
cob.
Farm Prints
Use farm shaped sponges to create a
farm scene, have the child try to tell you what each sponge is
and
where it should go in the farm picture. Use real grass for tactile
stimulation and creativity, if desired.
Farm Collage
Depending on the ages of the children, have them cut
out pictures from magazines or have
them already cut out for them.
Find pictures that would go with farms like barns, animals,
etc.
Have the children glue the pictures they choose on a piece of
construction paper to make a barn
scene. Have them use markers or
crayons to add things they would like that there was not a picture
for.
Farm Animal
Puppets
Cut large pictures of different farm animals from magazines.
Cover with clear contact paper. Attach craft sticks.
Pre-K Fun Theme Pages are
for educational reference only!
No copyright infringement is intended.
I do not claim any of these as my own ideas.
They are shared from friends and fellow group
members.
Thanks for sharing all your great ideas!
|