|
Candy Cane Arts & Crafts
Candy Cane Paper Ornament
IF your students can cut, let them. IF NOT,
PRECUT red construction paper in the shape of a candy
cane. Cut white strips (for the stripes). Have the
students glue the strips on the red candy cane. After
the glue dries, let the student punch a hole in the
top and thread a pipe cleaner through! (cut it about 3" long!)
AN ORNAMENT!!
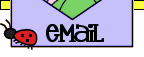
Candy Cane Painting
(Photo by
Michelle Whary)
Have children cut out a candy cane shape from white
construction paper and paint the stripes with red paint.
Add peppermint extract to create scented paint.
It will smell good enough to eat!
Mosaic Candy Canes
Cut out large candy canes (depending on the skill of the kids,
either I cut them out, or they do)
and have kids rip or cut up small pieces of red/white construction
paper (could use tissue paper)
and then glue the tiny pieces onto the candy cane cut out shape in
a red/white pattern.
Peppermint Candy
Give each child a large circle cut from white poster board.
Set out a shallow container of
red paint and several strands of yarn attached to separate craft
sticks. Encourage the child
to grasp the craft stick and dip a strand of yarn into the paint.
Then have the child drag the
yarn across the circle cutout. Repeat the process several
times. After the paint
is dry, wrap the circle in clear cellophane, tying the ends with red
curling ribbon.
Sweet Candy Cane Heart

(Photo by Shell)
Give each child one pc. of construction paper that has been folded
in half to create a card.
On the front of the card, let them glue a photo of themselves in the
middle of the page.
Then glue two candy canes on both sides of the picture to
create a heart shape.
Attach the following poem to the inside of the card.
Two striped candy canes,
As simple as can be,
Together make a heart
That sends love to you from me!
Red / Green Candy Canes
Here's a simple craft for the little ones. You will need the
following supplies:
Pre- cut candy canes shape (white-I like to used the card stock
paper for durability),
green and red construction paper, and glue. Have the
students tear the red and green
construction into small pieces. Students are to glue one red piece
of paper onto the
white candy cane (1 drop) then glue a green piece, then red, until the
candy cane is
full of red and green construction paper. When dried, punch a hole
at the top and string a piece of yarn and hang on the tree!!
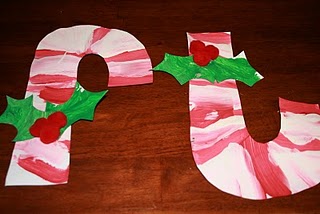
Candy Cane Reindeer
(Photo by Shell)
Use Candy Canes and decorate them to look like reindeer with the
hook part of the
cane being the nose. Add antlers, beaded eyes, etc from construction paper
or foam.
Materials Needed (for each reindeer)
1 candy cane
1 brown pipe cleaner
1 small red pompom
2 "wiggly" eyes
Hot glue gun
Optional: gold cord / ribbon
Directions
Wrap the pipe cleaner around the candy cane where it
curves down at the top,
shape to form antlers. Hot glue the eyes on and the red pompom on
(this is the nose).
As an option, you could hot glue some gold cord on (near the
antlers) in a loop to use as
an ornament hanger. Hot glue gun should be operated by an adult or under
adult supervision.
Candy Cane Sled
Materials Needed
2 6" candy canes
1 small gift box up to 3" square
(white or color of your choice for sled bed)
8" Christmas braid, jute or ribbon of your choice
Thick tacky glue
Clear tape
Small gifts and/or candies of your choice to fit inside gift box
Directions
Arrange candy canes side by side with hooks pointing
upward to form the
sled runners. Glue the gift box to the two candy canes just behind
the hooks.
Set aside and allow to dry thoroughly. With the Christmas braid
(jute or
ribbon) knot one end around each candy cane hook for the sled pull
rope.
Place gifts or candy in the box and close with a small piece of
clear tape.
Candy Cane Creation
Cut out a large candy cane from poster board. Draw on the
stripes.
Place it on the table along with glue and red tinted wagon wheel
pasta.
Have child glue on pasta wheels to fill in the candy cane stripes.
Easel Candy Canes
Encourage your children to paint a huge candy cane shape on the
easel. Cut it out of white
paper and give children red paint or vice versa. You can scent the paint
with peppermint extract.
Talk to the kids about stripes and encourage them not to paint the whole
cane one color.
Candy
Cane Cradle
You
take your candy cane however you want them to make it turn it
upside down.
Attach a star and curling ribbon to the top. Glue Spanish
moss to the bottom of the
project to resemble a manger. Then draw a picture of a baby cut out
and attach
to the moss. You now have a J is for baby Jesus!.
Paper Towel Tube Candy Cane
In advance, collect two paper towel tubes for each child in your
class.
Have the child paint one tube red and one tube white. When the
tubes are dry,
help him cut each one into six pieces. Next, provide the child with a 24
inch length
of floral wire; then have him thread the tube pieces. onto the wire,
alternating
the colors. Bend the ends of the wire around the edges of the top and
bottom
pieces. Then have the child bend the wire into the shape of a
candy can.
Candy Canes
Cut out a cane shape from white construction paper. Set
out a bowl of red strips the same width as
the cane and have the children stripe their canes. These look very cute
hanging on the handprint tree.
More Candy Canes
They may draw their own candy can shape onto a white piece of
paper and cut it out on their own.
Then have them paint on the red stripes, or they may use red crayons or
markers.
-OR-
You draw the candy can shape onto a white piece of paper and the
children cut it out on their
own. Then have them paint on the red stripes, or they may use red
crayons or markers.
-OR-
You draw the candy can shape onto a white piece of paper and the
children cut it out on their own. Draw
lines where the stripes should be. Then have them paint on the red
stripes, or they may use red crayons or markers.
-OR-
You draw the candy can shape onto a white piece of paper and the
cut it out for them. Draw lines
where the stripes should be. Then have them paint on the red
stripes, or they may use red crayons or markers.
-OR-
You draw the candy can shape onto a white piece of finger paint
paper and then cut it out for them.
Place masking tape where the stripes will be. Then have them paint
on the red stripes,
or they may use red crayons or markers. When the project is dry
remove the tape.
Merry Mice
Cut a large egg shape from gray construction paper. Attach
two hole reinforcements for eyes
and glue a pom pom nose in place. Staple a one foot length of ribbon
above the eyes and
then turn the project over and cover the staple ends with masking tape.
Also tape the straight
end of a candy cane to the back of the project to make a tail. Turn
the mouse over
and help a little one tie the ribbon into a large bow, forming the
mouse's ears.
Pre-K Fun Theme Pages are
for educational reference only!
No copyright infringement is intended.
I do not claim any of these as my own ideas.
They are shared from friends and fellow group
members.
Thanks for sharing all your great ideas!
|