|
Summer Arts & Crafts Ideas
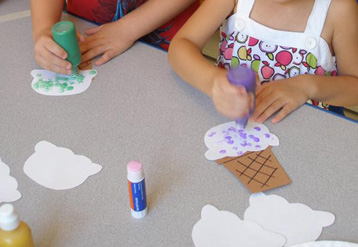
Dotted Ice-creams

(Photo submitted by Nanette)
Pre-cut ice cream scoops out of white paper, and cone out
of brown and added ink
details. Kids used dot painters to paint scoops and glued
scoops to cone with glue stick.
(Photo submitted by Nanette)
(Click
HERE for free Ice Cream
& Cone pattern)
Watercolor Sunset
Have each child to use a spray
bottle to dampen a sheet of white construction paper with water.
Then have him/her use watercolors to paint bands of colors
across the paper. Hold the paper by the top corners
over a tray, allowing the paint to drip and the colors to blend
together. When the paint is dry, have
the child glue a half circle cut from fluorescent orange paper
near the bottom of the scene. Finally,
help the child to glue on a torn strip of blue paper to simulate
the ocean's waves.
Make Sunglasses:
Cut sunglasses shape out of
cardboard. Glue on colored saran wrap to make lenses.
Shaving Cream Scoops
To make this melting ice cream cone
craft, first mix together one part glue, one part shaving cream,
and a few drops of food coloring. Glue a tan cone shape onto a
sheet of construction paper. Dab a bit of the
mixture over the top of the cone and gently form it into the shape of an
ice cream scoop. Then hang the project to
dry for 24 hours. The ice cream mixture will puff up and some of it
will run, giving the effect that the ice cream is melting.
Sidewalk Art
Provide your children with colored
chalk. Invite them to use their imagination to create designs on a
cement
sidewalk or patio. Let the children use a hose to wash away the
chalk designs or leave them until the next rainfall.
Painted Desert
Fill spray bottles with food color
water and let the kids spray the sandbox sand. You'll have
your own painted desert.
Then show them how to magically return the sand to normal by
turning over with a sand shovel and start again.
Sand Pictures
Materials
Needed:
A sheet of 9"x12" white
construction paper,
various colored construction paper,
diluted glue and sand
Directions:
The child spreads the
thinned glue over the paper below the horizontal line. (A brush or
fingers may be used.) Sand
is sprinkled on the glue and the excess is shaken off. An umbrella and a
beach ball are then glued on the paper.
Summer Collage
Materials
Needed:
Magazines, travel brochures,
and posters Glue Construction Paper
Directions:
Have the children cut
pictures of things that remind them of summer. Foods,
camping,
sailing, summer sports, swimming, etc. Glue them onto the paper to
make a summer collage.
Summer Fun Watercolors*
Materials
Needed:
Tempera Paint, Sand, Paper,
Brushes
Teacher
Preparation:
Mix a small amount of sand
into the paint to give it a textured look and feel.
Directions:
Give the children a piece of
paper and let them free paint with the textured paint.
Hand Print Suns
Dip or paint child's hands yellow
and put them down on a paper in a circular pattern (like the sun).
We added faces and smiles! They were really cute and looked
great on the bulletin board!
Koosh Ball Painting
Tape a very large piece of paper to
a wall or fence. Obtain several rubber band Koosh balls in
different
sizes. Dip each one in a color of washable tempera paint. Have the
children throw the balls at the paper.
Picnic Bags
Give your children paper lunch bags
to decorate with crayons, felt tip markers, or rubber
stamps. Let them use their bags for packing lunches before going outdoors
for a picnic.
Barefoot Painting
Materials
needed:
Butcher Paper
Paint
An outside area, near dirt or sand.
Aluminum Pie pans
A chair
Soapy water
Teacher
Prep:
Place a long strip of
butcher paper on the ground near your sand or dirt source. Place
chairs next to pans of paint along the edges. Place a bucket of soapy
water nearby.
Process:
Have the children sit in the
chairs and dip their feet in the paint.
Then have them dip their painted feet into the sand or dirt.
Let them walk along the paper, leaving "dirty" footprints.
Have them wash their feet in the soapy water when finished.
Concepts
learned:
Sand is squishy when wet.
Sand helps us to not slip in the wet paint.
We leave footprints when we walk.
Soap and water make us all clean again.
Butterflies
Let each of your children flatten a
paper baking cup and decorate it with crayons or felt tip
markers.
Show the children how to make a butterfly shape by pinching
together the center of the flattened cup.
Then help each child twist a pipe cleaner around the pinched
center and curl the ends to resemble antennae.
Sunflower Delight
In advance, cut several potatoes in
half. Trim some of the halves to make a petal shaped prints and
some to make
square prints. To create a sunflower, dip a square printer into
brown paint; then repeatedly press it onto a large sheet
of art paper, creating a somewhat circular design. Outside this,
use a petal shaped printer and yellow paint to encircle
the brown area. When the paint is dry, cut around the flower shape.
Glittering Sunshine
Draw or trace a large sunshine
shape on yellow construction paper and cut it out.
Use markers to draw a smiling face in the middle of the cutout.
Using thinned glue to
which a lot of gold glitter has been added, "paint" the pointed rays of
your sun.
Sun Catchers
Cut out 2 of any shapes of contact
paper, (square, circle, triangle), let the children put on
ANYTHING that goes,
scraps of small paper, glitter, bits of curling ribbon, colored hole
punches, you name it... Then using the other
sheet of contact paper, lay it on top the first one, smooth it out, trim
the edges, hole punch it and hang
in a window and you have a beautiful sun catcher.
Dandelion Jewelry
If your yard is "blessed" with
dandelion weeds, this is the perfect activity for you!! Get the
kids to pick the
dandelions... go for the best ones, with long stems. Collect a couple
dozen or so. The easiest way to
connect them is to wrap one stem carefully around another and tie a knot.
Another way is to carefully
slit the stem of one dandelion close to the flower, then feed the stem of
another one through it.
(You will need dandelions with thick stems for that one).
Make some bracelets, necklaces, anklets, headbands etc!!
Toss 'N' Paint
Cover a small section of sidewalk
or work area with newspaper. Set a large cardboard box in
the center
of the paper. Place several shallow pans of paint and a supply of sponges
a short distance away from the
box. To begin the activity, a child places a sheet of white construction
paper inside the box. She dips a
damp sponge into a pan of paint and then tosses the sponge into the box.
The child retrieves the sponge
and continues painting in this manner. When her design is complete, she
removes the paper
from the box and sets it aside to dry.
Box House
Ask a local appliance store to
donate several large appliance boxes. Take the boxes outside and
let your
children help you arrange them to make a house. Duct tape the
boxes in place. Cut out windows and
doors. Let your children paint their box house. Help them
experiment with different ways to apply the paint,
such as using small and large paint brushes, cotton balls, spray
bottles (dilute the paint first), hands, feet,
and other ideas they think up. When the paint is dry, give
your children markers or crayons to decorate
the inside of their house. Let them bring out a selection of
items from your housekeeping area to
use while playing in their box house.... for example, plastic food,
dishes, and so on.
Sun Tambourines
We created sun tambourines. Start
with paper plates, and paint them yellow.
We cut out eyes from black construction paper and and made them a
face.
We used a red marker for the mouth. After they dried we stapled
them together,
placing beans inside before we did and yellow and orange
streamers around
the edge. The kids loved them and the parents thought they were
great as well.
Beach Bunnies
For each of your children, tape a
long piece of butcher paper to the floor. Have each child lie on
the paper
and pose as desired, while you trace around his or her body with a dark
crayon. Help the children draw on
facial features and other details. Let them decorate their shapes with
paint, crayons, or felt tip markers
before you cut the shapes out. Draw a bathing suit on each child's
shape for him or her to color. Let your
children decorate butcher paper "beach towels" to use as a
background display for their shapes.
Sand Castles
If you have a sandbox, wet down the
sand and build sand castles.
Sun Catchers
Mix together two parts liquid
starch to one part water. Cut cheesecloth into 4 to 5 inch
squares.
Let your children dip the squares into the starch mixture, squeeze out the
excess, and flatten on
waxed paper and squeeze on drops of various colors of food coloring.
Allow the shapes to stiffen and
dry for several hours or overnight. Once the sun catchers are
completely dry, hang them in a window.
Palm Trees
Give each of your children a
cardboard toilet tissue tube for a tree trunk. Help each child
make several
hand shapes out of green construction paper for palm fronds by tracing
their hands onto the green paper.
Let your children glue or tape their fronds to the inside of the
top of their tissue tube tree trunks.
Popsicle Puppets
From different colors of
construction paper, cut out shapes that resemble the frozen part
of Popsicles.
Let your children use felt tip markers to add faces and other desired
details to the shapes. Then help
them glue on plain craft sticks for handles. Encourage the children to
use the puppets for telling stories.
Sun Collage
Have the children cut out pictures
of people doing things out in the sun.
Ice Cube Painting
Make ice cubes in an ice cube tray.
When half way frozen, stick a popsicle stick in. When ice is
completely frozen, you are ready to begin. Sprinkle some powdered
paint on a piece of paper. Use
different colors. Give each child an ice cube with stick and let
them rub or drag it on the paper. Ask
them what is happening to the powered paint. What has happened to
the ice cube?
Squirt Gun Drawings
Use squirt guns to draw designs on
the pavement.
Also, make a target on the pavement with chalk and have the
children make it disappear with the squirt guns. If you don't
allow your
children to play with squirt guns, you can purchase little squirt
toys to use instead
Pre-K
Fun Theme Pages are for educational reference only!
No copyright infringement is intended.
I do not claim any of these as my own
ideas.
They are shared from friends and fellow
group
members.
Thanks for sharing all your great ideas!
|