Valentine's Day Arts & Crafts Ideas
Hand-some Heart
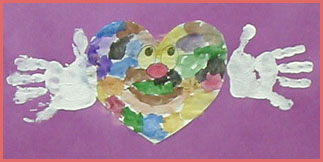
Photo submitted by: Denise
Cut out a heart
shape. Draw face on heart. Encourage the children to water
color the heart. Then using tempera paint, paint each child's hands
and stamp next to heart to create this hand-some heart!
Sparkling Heart
Paint a large heart with red, pink or white paint. While the paint is still damp,
sprinkle some salt over the painting. The heart will sparkle when it dries!
Valentine Fingerprint Hearts
Cut heart shapes out of white or pink
construction paper. Give the children washable
red ink pad and let them
decorate the hearts with their fingerprints or thumbprints.
Encourage them
to make pics with their thumbprints such as hearts,
love bugs, and so on.
Valentine Person
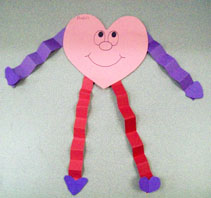
(Photo submitted by Shell)
Trace child's hands and feet. Cut out a big size
heart and let the child make a face on it.
Then take paper
and make an accordion out of it. Use the accordion strips for arms
and legs.
Glue their hand and feet prints and you have a valentine person with their
prints.
Heart Straw
Trace and cut out heart from colored paper. Use a
hole pinch and make 2 hole
in center of heart, not side by side, but one under
the other, about an inch or
two apart. Thread a drinking straw into one hole and
back out the other.
Heart Rubbings
Cut out different sizes of hearts from sandpaper.
Tape hearts to table and
lay a sheet of white typing paper over them. Use side
of crayon
to lightly rub over hearts, making a pattern on paper.
Variation:
Set out a large square of
plastic lace (available where self-stick paper is sold). Cut heart
shapes out of
plain white paper. Let the children take turns placing their hearts on top
of
the plastic lace square and rubbing across them with red crayons. If
desired, let them glue
their lacy heart rubbings on folded sheets of red
construction paper to make valentine cards.
Heart Texture Collages
Cut heart shapes
of different sizes from a variety of textured materials (corduroy, flocked
wallpaper, sandpaper, velvet, foil, etc.) Cut heart-shaped centers
out of some of the shapes,
if desired. Set out glue and pieces of white construction paper.
Let the children select
the heart shapes they want and glue them all over their papers to make
texture collages.
Love Bugs
Cut out a supply of pink and red construction
paper hearts. Then direct each child
to arrange a line of hearts in a
pattern and glue them together. Have the child
add wiggle eyes and
construction paper antennae and legs. If desired, invite
the child to use
glitter glue pens to give the love bug a little extra sparkle.
Vinegar Hearts
Pour white vinegar
into small bowls. Set out brushes, pieces of white construction
paper and small red tissue paper hearts. Let the children brush vinegar on
their
papers. Then let them cover their papers with the tissue paper hearts.
As it dries, the hearts will fall off leaving red heart prints.
Translucent Hearts
Cut a large heart shape for each child out of
waxed paper. Pour vegetable
oil into shallow containers and set out cotton
balls. Let the children tear red
tissue paper into small pieces.
Have them dip the cotton balls into the vegetable
oil and brush it over their
waxed paper hearts. Then let them press the red tissue
pieces all over
their hearts until the shapes are completely covered. The oil will
help
the tissue pieces stick to the hearts while making the red color translucent.
Heart Prints
Pour small amounts of red and pink tempera paint
into separate shallow containers.
Set out heart shaped cookie cutters and
sponges cut in the shapes of hearts.
Let the children make heart prints by
dipping the cookie cutters and sponges
into the paint and pressing them on
sheets of white construction paper.
Tissue Heart Collages
Set out sheets of white construction paper, small
bowls of liquid starch and
brushes. Give each child a number of heart
shapes cut from red tissue paper.
Have the children brush the starch on
their papers. Then let them
arrange their tissue paper hearts on top of
the starch to make collages.
Panda Bear Valentine
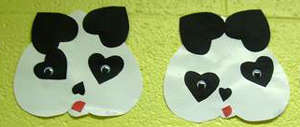
(Photo submitted by Shell)
Precut the hearts and encourage the children to glue the
hearts to create a Panda pal.
(Click HERE for pattern!)
For older children, encourage them to create a Panda without using patterns.
3-D Hearts
Have the children cut three hearts the same size
and fold them in half.
Glue the hearts together and decorate them with glitter.
Use a
hole punch to put a hole in the top and hang around the room.
Shiny Valentine
Mix white glue with dry red tempera. Cut a
three inch square of oak tag paper.
Cover the square with foil. Paint
a valentine picture on the foil with glue.
Frame or glue on a large red
heart.
Valentine Sticker Collage
Cut big red hearts out of construction paper.
Give
children Valentine stickers to put on the heart.
Heart Mobile
Make different sizes of hearts.
Attach
hearts to strings.
Finger Paint Fun
Set out red, white, and pink finger paint for
the
children to let their creativity run wild.
Friendship Chains
Let each child glue strips of red, pink and white
paper together to make a chain.
At one end of the chain, staple a paper
heart shape with the child's name printed
on it. Then ask the child to
name his or her friends. As the child does so,
print the names on the
loops of his/her chain.
My Heart Is In Your Hands
Spread some love with these valentine keepsakes.
To make one,
a child dips his hands into washable red tempera paint. Then
he
presses them onto a sheet of white construction paper so that the
palm prints
are side by side and the thumbprints and fingerprints overlap.
When the
paint is dry, cut around the heart; then add a message,
the child's name, and
the date.
Valentine Photo Boxes
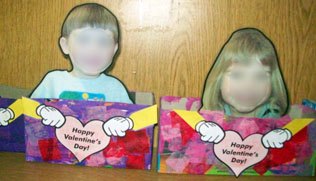
(Photo submitted by Shell)
Some of the younger kids are not yet able to
recognize written names of their classmates,
so I decided to add everyone's photo to their boxes to make it easier for
everyone to deliver
their cards to their friends. Here are more of the Valentine
boxes.... the children painted them
on Monday... on Wednesday we added tissue paper squares and Friday morning
before
the party we added the face, arms, and hands. The kids really got a kick
out of these!
(Click
HERE for hands and heart
printable used in above activity)
Valentine Mice
Fold a paper heart in half and find the mouse.
The nose and whiskers are at the
tapered end, draw them in. For the tail,
glue a 3" long string on the inside of the fold
(opposite the end with the
nose and whiskers), and let it hang out. Add a greeting on the inside.
Variation:
Cut a large heart shape
from construction paper. Glue a small length of yarn for a tail
at the top of
the heart but let it hang off of the heart. Fold in half like a teardrop.
Stuff
with a little cotton. Glue edges of heart shut all around. Tail should be
hanging out. Cut a small heart for his ears. Fold heart in half. Glue on rounded
part
of big heart so they form an ear on each side. Add whiskers, eyes, and a
little pink nose.
Variation:
Fold a large piece of construction paper in half. Cut out a half-heart on
the fold.
The folded paper heart is the body of the mouse. The nose and whiskers are
at the tapered end. You can draw them in or add pom-poms and wiggly eyes.
Next glue a small length of yarn at the other end of the folded heart (the
top of the heart) Be sure to let it hang out some. Glue on smaller
hearts
for ears. I usually fold the top of the smaller heart down towards the
point
and then glue the rounded edges onto the paper to make the ears stand
out. Don't forget to add whiskers. Another cute touch is to sandwich
the end of the mouse's tail between two hearts. I use pink crinkle paper.
You can stuff these critters, or open them up and add a message,
or use them as a mailbox for valentines.
Heart People
Cut out many small and large heart shapes.
Each child glues a small heart above a large
heart onto a piece of paper.
The children then use markers to draw faces, arms, and legs.
Loveable Animals
Make a caterpillar, fish, bunny, and mouse with heart shaped cutouts.
Show the
children how to trace around heart patterns. Then let children
cut them out,
combine them into loveable animals, and paste them on white sheets
of paper.
I Love You Candy Container
Have the children trace their hands on pink,
white or red construction paper
and cut them out and after sponge painting a
clay pot (about 4") with little hearts,
glue the hand to the back of the
pot with the middle two fingers glued down
(the universal hand symbol for 'I
love you') Fill with little candies.
Valentine
Smoosh
Trace a large heart onto white paper and have the child cut it out. Using
squeeze bottles, drizzle red and white paint on one side of the heart then
fold it over. Have the child open it up to see their creation. Then mount
the heart on red construction paper.
Heart Designs
Take a
construction paper heart and let children use eye droppers to
drop paint onto the heart, fold it in half and have them slide their hand
over the heart to mix colors. Open it up and you have a neat design!
Valentine Crown
Using paper plates, red paint,
paintbrushes, scissors, white glue and conversation
hearts candy make
a Valentine Crown. Begin by cutting a slit across the middle
of the plate,
starting about an inch inside
the outer rim and stopping about an inch
from the outer rim on other side of
plate. Starting at the center
of plate, cut four
more slits to create six pie shaped sections. Fold sections
up to make a crown.
Paint the plate on one side and let dry. Paint other side of plate and let dry.
Decorate
crown by gluing conversation hearts to each point. Now Crown your King
or Queen.
Pom Pom Luv Bug
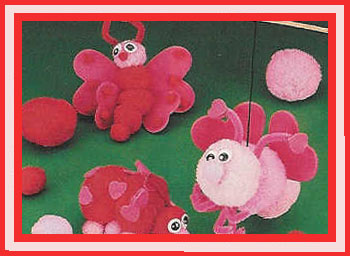
Using
red, pink, or white pom poms (of varied sizes),foam
heart shape pcs., wiggly
eyes, and pipe cleaners, encourage the children to
create their very own luv bug.
Smelly Valentines
Have the children cut two paper lace hearts then sew them together with yarn
and plastic yarn needle. Leave a small opening to stuff with cotton balls that
have been sprayed with perfume. Finish sewing and tie the ends together into
a
bow. Punch a hole at the top and attach yarn so it can be hung up. "Happy
Valentine’s Day" can be written on it with a fine tip permanent marker.
Valentine Holder
Use two paper plates; cut one in half. Staple the half piece onto the
bottom
of the whole paper plate. Children can decorate them with hearts
cut from
construction paper or they can draw and color hearts on them.
Punch a hole
in the top of the whole paper plate and attach a piece of yarn for
a hanger.
Valentine Walkers
Have the kids cutout a valentine shape and add
accordion folded arms
and legs. The kids can be as creative as they wish with
the decorating.
Valentine Tree
A decorative centerpiece may be a group project.
The tree consists of a small tree
branch set in sand or clay. Trim the
tree with paper flowers, hearts, birds, and ribbons.
Sweet Sentiments
Here's a sweet way for youngsters
to send their valentine messages.
To make one of these imitation candy kisses,
begin by crumpling and
molding aluminum foil into the shape of a candy kiss.
Then write a loving
message onto a strip of white paper. If desired, draw
seasonal designs on
the strip or decorate it using an appropriate stamp and ink
pad. Embed
one end of the strip into the top part of the candy kiss form.
Rose Print Bouquets
Stock your art area with silk roses and shallow
pans of tempera paint.
If desired, add a few drops of rose potpourri oil
or perfume to the paint.
Invite the children to dip the roses into the
paint and then press them onto
large sheets of paper to create rose prints.
Everything is coming up roses!
Valentine Placemats
For each child cut two identical placemat ovals
out of clear self stick paper.
Remove the backing from one of the ovals
and place the oval in front of the
child, sticky side up. Set out
different sizes of red, pink and white hearts
cut from tissue paper. Let
the children arrange the hearts on their sticky
ovals any way they wish.
Have them add sparkle by sprinkling on gold,
silver, and red glitter. To
complete each child's placemat, remove the
backing from the second oval.
Then carefully place the oval,
sticky side down, over the child's decorated
oval.
Marbled Heart
Painting
Cut large
heart shapes out of white construction paper. Place the heart into a
clothing gift box along with 1 or 2 marbles that have been dipped into red
and/or
pink paint. Close the lid and let the kids shake/tilt the box for a minute
or so.
When they open it up, they will have a heart with a "marbled" design on
it.
They look really cool and the kids love seeing what happened to the heart.
Heart Art
Here are some simple ways to teach your little
ones how to draw their own hearts. To begin,
have each child fold a piece
of paper in half. Then have him/her place a thumb at an angle on
the fold.
Help the child trace his/her thumb - starting and ending at the fold- to create
the
outline of half a heart. Or the child could substitute the end of a
large craft stick for his/her thumb.
Or show the child how to draw an
angled candy cane on the paper fold. Invite the child to make
several
tracings. Then have the child cut out the outlines, unfold the cutouts,
and decorate the
heart as he/she desires. Allow the child to glue his/her
hearts onto
a construction paper background to create a design or picture.
Valentine Fan
Have children cut out a heart from tagboard. Have them decorate it.
Attach a
craft stick to each to create a valentine fan.
Stained Glass Hearts
The teacher cuts heart shapes out of waxed paper and each child grates pink,
red, and white crayons
onto one heart. Cover with another waxed paper
heart. The teacher irons the hearts with a warm iron.
Cut heart
shape from center of construction paper heart. Tape waxed paper
behind
heart shaped hole. Display hearts on windows for a stained glass look.
Bleeding Heart
Use a black magic marker to draw a heart outline on paper towels.
Brush
water onto the outline. Watch the colors bleed.
Puffy Hearts
Cut out hearts from a paper bag. Cut two of each, and have the kids glue them
together,
leaving a small opening. Stuff the heart with fiber fill or Kleenex or
fabric scraps, then glue
the opening shut (don't stuff too much). Have the kids
decorate with fabric scraps, old lace
pieces, cutouts from doilies, ribbon,
stickers, glitter, sequins, etc. If you make enough of these,
and not too big,
you can hot glue them to a cheap wreath and make a valentines wreath!
Add a bow,
some ribbon or raffia, and some valentines day pics to finish the look.
Red Valentine Collages
Give each child a large heart shape cut from red
construction paper. Let the children decorate their
hearts by gluing on a
variety of red materials such as rickrack, lace, ribbon, yarn, paper scraps,
fabric pieces,
heart stickers, and glitter. When the glue has dried, display the
red valentine collages on a wall or a bulletin board.
I Love To...Pictures
Using crayons or markers, children draw pictures
of all the things they love to do.
Valentine Alphabet Book
Help the children make a class alphabet book with
old valentines. Collect as many different
valentines as possible.
Put all of the valentines out on a table for the children to see. Have
them find one valentine to glue on a page for each letter of the alphabet.
For example,
a valentine with an airplane or animals might be glued on the
"A" page, valentines with baby,
balloons, or bunnies could be glued on
the "B" page, and so on. Encourage the children to
use their
imaginations! Use extra valentines to make a wonderful border for an
alphabet
bulletin board or as a border to display work children have completed
while working on the letter V.
Patchwork Heart
Cut an extra large heart shape out of pink
construction paper or butcher paper.
Cut the heart into sections (one for
each child). Mark the back side of each section
with a pencil. Let
the children use red crayons or felt tip markers to decorate the front
sides of
their sections any way they wish. When they have finished, help them
put
their patchwork heart together like a puzzle and glue it to a piece
of white
butcher paper. Then hang the heart on the wall or bulletin board.
Valentine Decorations
Cut small heart shapes from red and pink
construction paper, wrapping paper, foil, tissue boxes, etc.
Use a hole
punch to punch out "dots" from the same materials and cut paper lace
into small pieces.
Give each child a small paper doily. Let the
children brush glue on their doilies and place the heart
shapes, dots and paper
lace pieces on top of the glue. Allow the glue to dry. Then attach
loops of yarn to the backs of the decorated doilies and hang them around the
room.
Valentine Clown
Combine different sizes of red and white
valentines to make a happy clown. You draw the hearts,
then let the
children cut them out and paste them together. You may also show the
children how to
fold a paper in half, draw half a heart, then cut the folded
paper to get a heart the same shape on both sides.
Valentine Totes
Place a 12" x 18" sheet of clear
Con-Tact paper on a table, adhesive side up. Have a child place tissue
paper heart shapes on the adhesive side of the Con-Tact paper. Next, cut
an 11" x 18" sheet of Con-Tact
paper. Center it over the first
sheet of Con-Tact paper and then place it on the paper adhesive side down.
Next, fold the Con-Tact paper in half to 12" x 9" and pinch the sides
to seal the edges. If desired,
staple each side for added reinforcement.
Punch holes at the top of the tote
and then thread a length of yarn or ribbon
through the holes to create a handle.
King and Queen of Hearts
For the figure of the king, use a toweling roll
covered with construction paper and crowned with little
paper hearts. A
piece of paper rolled into a cone shape forms the queen's body.
Make a
tiny slit at the top to hold a heart-shaped head, with paper lace for the crown.
Royal robes may be made of paper or cloth, trimmed in sequins, hearts, metallic
foil, or paper lace.
Valentine Bunny
Fill baby food jar with cotton balls. Cut out 1
large heart, which is just a little taller and wider than
the front of the jar.
Cut out a medium size heart, which is about 1 inch larger than the base of the
jar. Cut out 2 small hearts (about the size of a penny or dime). Glue large
heart to the face of the
jar so that the top of the heart extends beyond the top
of the jar (gives the appearance of ears).
Glue medium heart to the base of the
jar so that the top of the heart extends beyond the bottom
of the jar (top of
heart sticking out from the base will look like feet). Glue small hearts on the
sides
of the jar in the middle (looks like hands). Glue a cotton ball to the
back of the jar
(looks like a cottontail). Have kids draw the face on the large
heart before gluing.
Heart Flowers
Use a green crayon to draw stems on pieces of
white construction paper. Let the children glue smal
l yellow construction
paper circles at the tops of their stems for flower centers. Give them
heart shapes
cut from different colors of construction paper to glue around
their flower centers for petals.
Then let them glue on larger heart shapes
cut from green construction paper for leaves.
Potato Print Valentines
Cut a potato in half and cut a heart shape on one end of the cut ends. Paint the
heart
shape red and press it onto white paper. Allow the children to make any
pictures they wish.
Heart Fold-Overs
For each child cut a large heart shape out of
white construction paper and fold it in half.
Set out squeeze bottles
filled with red, pink, and lavendar tempera paint. Have the children
lay
their heart shapes out flat. Let them squeeze drops of paint on one half
of their hearts,
fold their shapes closed and gently rub across them with their
hands.
Then have them open their heart shapes to reveal the designs they
created.
Candy Hearts Photo Frame
To make the frame, cut a piece of cardboard into
a rectangular shape...then cut another rectangle
inside it (large enough for a
photo to fit inside). Let children glue on conversation hearts around
the
frame. Then you lacquer them and let dry. Then slip a picture of the child into
the frame.
Valentine Confetti Collage
Provide a variety of Valentine confetti for the
children to glue
onto a construction paper heart to make a confetti collage.
Heart Bears
For each child cut from construction paper one
bear shape, five small heart shapes to glue on the bear's
paws and nose, and one
large heart shape to glue on its chest. Let the children glue their hearts
on
their bears. When the glue has dried, let the children add eyes and
other details with felt tip markers.
On the back of each child's bear,
print "A Beary Happy Valentine's Day!" and help the child sign his or
her name.
Lovely Creatures
Set out glue and different sizes and colors of
construction paper hearts. Let the children glue
the hearts together any
way they wish to create "lovely creatures." Have them add
details with
crayons or felt tip markers, if desired. Display the
children's creations on a wall or bulletin board.
Love Puzzles
Draw a large hearts. Have the children
decorate them. On the back draw lines to create a jigsaw
type puzzle.
Make sure you explain to the children that you will be cutting their decorated
heart into
smaller pieces...they may not want you to do this to their work.
Cut along the lines to make the puzzle.
Valentine Mailbox
Teacher glues red construction paper on the shoe
boxes ahead of time. The children decorate their
shoe box any way they want to
with stickers, paper scraps, or whatever is available. The mailboxes
are for
putting in the Valentines each child receives. Teachers can put treats in as
well.
String Painting
Cut a heart shape and fold it in half. Open the
fold and use valentine colors to string paint.
When the painting is complete
fold the heart in half and press together, then open
up to see the beautiful
designs. Attach strings to clothes pins for easier handling.
Valentine Candles
Use a 3" heart on poster board as
candle base. Center a small york mint patty onto heart.
Stick on with
double stick tape. Then, place a small piece of tape on one end of a
lifesaver roll, attach to mint.
Place tape on flat end of a hershey kiss or hug
and attach to top of lifesaver roll. It should now look like a candle.
Hershey Kisses Rosebuds
Take two Hershey kisses, still in foil, place
flat ends together. Take a 4 1/2" x 4 1/2" piece
of cellophane.
Place the kisses in the middle,
bring the cellophane down around a point and twist
tightly, this is your
"rosebud". Holding
the twisted end next to a floral pick with wire attached (6") and starting
right at the
base of the kisses, wrap the
wire tightly around the twisted end of the "rosebud". Wrap
green floral tape
tightly around the wire and cellophane. While wrapping with
tape add an artificial leaf up next to the bud.
Tips: You can go a bit smaller on
your square size but it is trickier. Might want to have it a little
big until
you get the hang of making them. If you start too far down on the twisted
cellophane
the bud will be floppy. The tighter you can twist the
cellophane and the tighter you wrap the
wire the better your stem looks, not too
bumpy. · After a few tries you will get the hang of it.
You may also choose to
use other colors of cellophane, yellow, blue or purple.
A mixture of all the
colors makes a great bouquet.
Valentine Finger Puppets
Copy one large heart onto red or pink
construction paper, one medium heart, and two small hearts.
Cut two
6" strips of pink or red paper for each child. Invite each child in a
small group to make a
finger puppet. To make one, cut out all the hearts.
Punch two holes at the top of the large heart
(side by side from each other).
Then cut four tiny slits around the holes to make larger openings.
Draw
heart shaped facial features on the medium cutout. Then glue the face onto
the point of
the large heart. Next, accordion fold each paper strip.
To make arms for the puppet, glue a small
heart to one end of each paper strip;
then glue the other end of each strip to the large heart.
To give the
puppets legs, poke your index and middle fingers through the holes in the large
heart.
Valentine Crayons
To begin, gather several small, single-serving
pie tins. Mold each tin into the shape of a heart.
(Be careful not
to crack the tin.) Then invite the children to gather broken red, pink,
and purple,
crayons. Have them peel the paper off the crayons. Then
ask youngsters to break the crayons
into small pieces. Have them sort the
crayons by color, filling each tin almost to the rim.
Then the teacher
heats the crayon filled tins in a 250 degree oven until the crayons melt into
soft,
but not watery, substance (about 5 to 10 minutes). When the crayon
hearts cool, remove them
from the tins. Then provide youngsters with heart
cutouts from different materials such as
sandpaper, plastic canvas, and textured
wallpaper samples. Invite each child to use
the special valentine crayons
and cutouts to make heart rubbings on a sheet of paper.
Tabletop Hearts
To make these cute place markers for your
Valentine Party table, begin by making the base.
Cut a two inch section
from a paper towel tube. Then cut two parallel slits halfway down the
tube.
Provide each child with heart stickers and invite them to decorate
their base. Next, use glitter
glue to write the child's name on a
four-inch heart cutout. Invite each child to decorate the hearts
with
sequins, stickers, or stamps. Then have the children place their hearts in
the slits of
the bases. On the day of you Valentine party, set each
child's place marker
at the table and then challenge your youngsters to find
their seats.
Dot-to-Dot
Shape and letter recognition will shape up with
these easy-to-make dot cards. To prepare,
program several index cards with
different shapes and letters. Next squeeze dots of colored
glue on the
letters and shapes. When the glue is dry, place the cards at the table
along with
crayons and paper. Encourage a child to place a piece of paper
over a card and use the side
of a crayon to rub across the paper until dots
appear. Then the child removes
the card and connects the dots to reveal
the shape or letter.
Gift of Love Jar
Take an empty, clean mayonnaise jar and fill it with sweet memories of the person you are making
it for.
It could be your husband, mom, child, family member or dear friend. Write them on pieces
of heart shaped
paper. Get one of those little glass votive holder to sit in the top with a pretty red candle.
Tie a pretty ribbon
around it and maybe paint Happy Valentines Day on the front of the glass.
Valentine Gift Idea
Materials Needed:
plastic spoon
piece of tulle
Chocolate kisses
ribbon
Make a little tag
Put some kisses in the spoon, wrap with a piece of tulle or cellophane wrap. Tie it off
tightly with a piece
of ribbon around the base of the handle, make a bow and attach your little tag with the following saying:
A spoonful of love
And a couple of kisses
I give to you as
My Valentine Wishes!
Candy Kisses Card
Here are some kisses from me to you
Because I love you and all that you do!
You could then cover a big construction paper heart with candy
kisses with the
verse in the middle. And have the children decorate them as they like
...if you wish.
Or paint them prior to putting on the candy kisses.
Valentine Card Box
Children usually give valentines to other students and their teachers. Usually each child decorates
some kind of container, and the valentines are delivered and deposited in each "mailbox." You
can help
save landfill space and natural resources by recycling a discarded tissue box to make a
valentine card container.
Valentine Hanging Decor
You can make a hanging
decoration by cutting out small scraps (I use
squares) of pink, red and white shades of construction paper, then gluing
them onto a large heart made out of poster board, card stock or even
construction paper. Punch a hole in the top and put narrow satin ribbon to
hang (you may want to apply hole reinforcements also).
Homemade Heart Stencils
Using clean styrofoam meat trays (donated from the grocery
store), cut out different sized heart stencils, one on each tray. The
meat trays with the hearts cut out are used for this project. I put the
cut out hearts in the stencil box for the children to use in the art
center.
Easel Painting
Easel painting on a big heart shape using red. Use a red maker to
outline the heart shape, so it is easier to see the shape.
Shiny Valentine Box
Wrap kleenex boxes with aluminum foil, cut
a slit in the middle where the tissues
used to come out of and then we let
the children glue different size,
red, pink and purple hearts on them. When
they are through
they fill each of them with their valentines.
Pre-K Fun Theme Pages are
for educational reference only!
No copyright infringement is intended.
I do not claim any of these as my own ideas.
They are shared from friends and fellow group
members.
Thanks for sharing all your great ideas!