|
Ornament Arts & Crafts Ideas
Popsicle Stick & Tongue
Depressor Ornaments
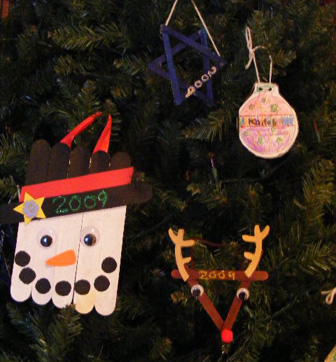
(Photo submitted by Mrs. Valerie)
The snowman was made with large tongue depressors. You can make
them any way you want.
The reindeer with three popsicle sticks painted brown. The star of
David was made with six popsicle
sticks painted with blue glitter paint. The paper ornament is from
an advent countdown calendar I found online.
Photo Ornament
Measure and cut a 9- by 4-inch piece of card stock and fold it in
half. Starting at the fold,
draw a simple ornament shape, tracing around the jar lid to create
the round portion.
Cut out the ornament, going through both layers but leaving the
fold intact. Open up the
cutout and lay a 9-inch length of string or cording across the crease.
Apply glue to the paper
just below it, refold the paper, and tie the string ends together to form
a hanging loop.
Cut a square from the shiny paper to fold over the top of the
ornament, using craft scissors
for decorative edges, if you like. Stick it in place with glue dots.
Decorate the outside
with glitter glue or stickers, then glue a photo, trimmed to fit, inside
the card.
Star Ornament
Cut out 2 star ornaments (or any shape you choose) from card
stock.
Punch holes around the edges and have the children "sew"
their stars together
with ribbon or yarn. Decorate with sparkle glue and glitter, buttons,
foam stickers,
pom poms (get creative). Attach a ribbon or yarn to the top or
glue a
clothespin on the back to use the star as a tree topper.
Optional: Cut a hole in the middle of the above ornament
to place the child's picture in it
Snowman Ball Ornament
Paint a child's hand with white acrylic paint and place a blue
ornament in their palm.
Have child close hand around ball and press fingers against it. Open hand
slowly and
lift up ball. When dry, add features to turn each finger into a
snowman. Date the
ornament and give to the parents for Christmas. We do these every year
and the parents
who have been here a few years talk about how great it is to see how much
their little
hands grew over the year and I have even had some parents whose
children moved on
to big kid school write me years later telling me how much they
still enjoy those ornaments.
Grinch
Ornament
Empty Film Container
Paint
Thin Ribbon
Cotton Balls (or cotton from pill bottles)
1 1/2 inch or 2 inch green pom-pom
Green Chenille Stem
Glue
Paint small rectangles onto the film container so they look like
bricks
(optional).
Let the paint dry completely. Cut an 8 - 10 inch
piece from the thin ribbon.
Fold it in hang to form the hanger for the ornament. Glue both
ends onto the top,
inside edge of the film container. Glue the cotton balls around
the top edge
of the film container. Glue the pom-pom so it is half-in and
half-out of the film
container, this will be the Grinch's bottom stuck in the chimney!
Cut two
3-inch pieces from the green chenille stem. Glue them to the
green
pom-pom to look like the Grinch's legs. Bend the bottom part of
the leg down to form the feet. Hang your ornament on the tree!
Mice Ornament
Remove the tags from two Hershey's
Kisses. Cut out mouse ears from pink felt, about 3/8-inch high.
Using double-sided carpet tape, affix the bottoms of the ears to the flat
side of one of the Kisses.
Tape an 8-inch loop of fishing line behind the ears to form a
hanger.
With more double-sided
carpet tape, join together the two flat
sides of the Hershey's Kisses, with the mouse ears and
fishing
line loop pointing up. Add a pair of self-adhesive googly eyes.
Slip a tail -- a 4-inch piece of curling ribbon -- under the foil.
Sugar Cone Ornament
Materials Needed:
Paper cup (15 oz works well)
sugar cone (the real edible ones)
colored tissue paper
white Elmer's type glue
2 1/2" foam ball
glitter
ribbon for hanging ornament
Directions:
They cut out the bottom of the paper cup to use as a stand
for the sugar cone. Cut tissue paper
into squares in a size you like. Mix a water/glue mix in a pan or pie
plate. Have kids roll the foam
ball in the glue mix. The tissues paper squares are put all over this
ball. Before that dries - have them
sprinkle glitter all over (like the candy sprinkles on a cone).
Let that dry. They apply glue thickly at the
inside rim of the cone and set foam ball down in cone. They tied a cute
ribbon in a bow and glued that
to the front outside rim of the cone and then cut a piece and attached to
the back top of the foam ball to
hang it on the tree. You could use a stick pin to attach this ribbon to
hang it by. VERY cute cone ornament.
I have no clue how the sugar cone will keep and if it gets icky after the
first month or if it will get icky in
your ornament box over the years.. you'll just have to see.
Foam Ball Ornament
Materials Needed:
Foam balls - size your choice
glue
glitter
eye hook (like the hook and eye on a door - but you only need the
eye - small
enough to put ribbon through to hang it ball by)
Directions:
Apply glue to foam ball as you like. Water glue mixture -
or simply glue only. Pour
glitter all over glue. When dry - push the eye down in the top of
the ornament. Tie
a bow from the ribbon to tie on the eye and then another ribbon as a
hanger.
Noodle Ornaments
I dyed noodles (the big round ones with an pen tunnel - rigatoni
maybe?) with green and
red food coloring and rubbing alcohol. I also painted some with
glittery paint, and spray painted
some with gold spray paint. We threaded these onto string, and they
loved that! I secured
the end by tying on the first noodle, and them let go to town with about
2' of string.
Foil Ornaments
Every child brings a toilet paper roll. Give each child a square
of aluminum foil to wrap around the roll
(glue is not needed).
Have them stick the ends of the foil in the roll. Then put dots of
tack glue on each roll
and give the children some colored pasta.
The children can glue their chosen colored noodles on their glue
spots.
Then give them each a piece of ribbon or yard to put
through the roll holl. Tie and shazam a homemade ornament.
Christmas Miniatures
Save the clear plastic "blister" pieces from things you buy. Cut
around them, cutting off and
discarding the cardboard. Using the clear plastic piece as a template,
trace around it onto
cardstock or a Christmas card. Find little things that will fit inside
this plastic...cotton for
snow, a small bell, Christmas confetti, a very small reindeer or Santa or
such, etc. Put
them inside the plastic piece and glue on the back you have cut. Punch a
hole at the top
and add a yarn piece for hanging. Yes, these things will move around
inside the plastic piece, but that makes them fun for the kids.
Pre-K Fun Theme Pages are
for educational reference only!
No copyright infringement is intended.
I do not claim any of these as my own ideas.
They are shared from friends and fellow group
members.
Thanks for sharing all your great ideas!
|