|
Halloween Art Ideas
Spider Web
Materials Needed:
Black Construction Paper
White Paint
Scissors
Round, Metal Cake Pan or Pie Pan
Marble
Procedure:
Cut a piece of construction paper to fit into the bottom of the cake pan.
Place about a half teaspoon of white paint in the middle of the paper.
Drop the marble into the cake pan and tilt the pan back and forth. As
the
marble passes through the paint it leaves trails of white on the paper.
(You can also have the kids glue plastic spiders on their pictures when they are dry!)
Pipe Cleaner Spiders
Show children how to
twist pipe cleaners together to form a spiders
body and legs.
Encourage them to create their own pipe cleaner spiders.
Handprint Spiders
Trace around each
child's hands onto black construction paper. You may want to
use a white
crayon to make the outline more noticeable. Then
have the child cut out their handprints;
cutting off the thumb.
Then glue the hand cutouts together with palms together -
fingers
sticking outward. Glue on wiggly eyes in center and viola...
a handprint spider!
~ OR ~
You can use black paint instead of construction paper! As
seen below.
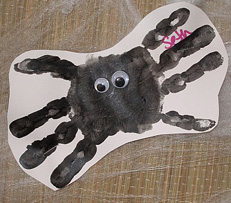
(Photo submitted by Nanette)
Masks
Set out the following items:
Yarn, Paper plates, felt-tip markers, and any other accessories
needed, to make
masks interesting, can be placed on a table in the art area. If desired,
yarn can be used as hair on the masks.
Fingerprint Spiders
Have the children make fingerprints
on a piece of paper using black washable tempera paint. When the
paint dries, have the children draw on eight squiggly lines for
legs on their fingerprints to represent spiders.
Scary Spider
Draw
around your child's hand on a piece of black construction paper.
Cut out the handprint.
Make eyes either by cutting small circles from white construction paper or
using paper
reinforcer rings. Glue the eyes to the palm of the handprint (with fingers
pointing down,
the top of the palm will become the head). Create a spider web by drawing
with
white chalk on a piece of orange construction paper.
Glue the spider to the web with the fingers pointing down.
Black & Orange Painting
Provide
black and orange paint at the paint easels.
OR
Let the children finger
paint using black and orange paint.
Halloween Finger Painting
Provide red and yellow paint for the children to mix
with their fingers onto a
pumpkin cutout shape.
Batty Bottles
Little ones will go batty over these Halloween water globes. To make one,
fill a small, clear plastic bottle with water. Squeeze in one drop of liquid
detergent and enough red and yellow food coloring to tint the water orange.
Add a generous pinch of bat- and moon-shaped confetti (found at party-supply
stores). Then hot-glue the cap onto the bottle. When the glue is dry,
a
youngster shakes the bottle to see the bats fly. Happy Halloween!
Foot Ghost
Trace child's foot out on
white paper turn it around and put
eyes and a circle mouth at he heel ... you have a GHOST.
~OR~
White tempera paint
footprints on black paper. Cut out, leaving a bit of black to
make an outline. Use the circle shaped notebook paper reinforcements for
eyes.
I Spy Pumpkin Pie
I spy pumpkin pie--and smell pie, too! These crafty pumpkin pies smell just
like the real thing. Fill a paper bowl with torn, orange tissue-paper
pieces.
Spray the pieces with cinnamon-scented air freshener. While the
pieces
are damp, sprinkle on pumpkin-pie spice. Trace the top of an empty
bowl onto a piece of orange paper; then cut out the circle. Punch holes
through the circle; then glue the circle onto the rim of the
"pumpkin-filled" bowl.
Halloween Ghost
Materials Needed:
1 pc. egg cups
markers
string or thread
white tempera paint
white tissue paper or crepe paper
glue
Directions:
Cut egg cartons into twelve single pieces. Poke a hole in the center
of each cup for string. Let the
children paint each egg cup. Do this early in
the day or the previous day. They must be allowed to dry.
the faces can
be drawn on with black marker or painted on with black tempera paint.
Tissue paper, crepe
paper, or white kleenex can be glued to the bottom
of each egg cup to give some flowing motion when
they are hung.
Hang the ghosts by stringing a knotted piece of string or thread through
a small hole in
the top of each cup. These can be hung
separately or hung in a ghostly mobile.
Cotton Ball Pumpkin Patch
Put cotton balls in a bag with powdered orange tempera paint and shake around.
Glue these cotton balls
onto paper with green yarn for a pumpkin patch.
(Variation: Orange pom poms can be substituted for the cotton.)
Pumpkin Pie
Cut out a pie shape. Give children shakers with cinnamon, ginger and nutmeg
in them. Children spread
glue over the paper pie shape and then shake spices on.
Pumpkin Pie Playdough
Ingredients Needed:
5 1/2 cups flour
2 cups salt
8 teaspoons cream of tartar
3/4 cup oil
1 container (1 1/12 ounces) pumpkin pie spice
Orange food coloring (2 parts yellow, 1 part red)
4 cups water
Directions:
Mix all of the ingredients together. Cook and stir over medium heat until all lumps
disappear. Knead the
dough on a floured surface until it is smooth.
Store in an airtight container. Place a batch of this dough in
your playdough
center. Add some fall cookie cutters, small pie tins (save from pot pies),
and rolling pins
to the area. (Invite your little ones to make fall cookies or
pumpkin pies. Remind them that these goodies only smell good. No
tasting please!)
Halloween Gourds
Take small softball size gourds. Cut out faces, cut small hole in the bottom
of the gourd, make sure to
clean out gourds, place yellow tissue paper
inside the gourds. Then you take small clear Christmas
lights, put each
bulb (or how may that you want) in each of the small holes in the bottom
of the gourds,
arrange in a small wooden shallow bowl or basket, arrange
corn, leaves, small pumpkins in bowl or
basket, plug in the lights.
Glowing Ghosts
Although the materials for this project are ordinary, the results are extraordinary.
To make a ghost, cut
through two thicknesses of waxed paper to make identical
ghost-shaped cutouts. Tint white glue by
adding a few drops of fluorescent paint
or food coloring. Spoon tinted glue onto one of the ghost cutouts.
Place black
construction paper cutouts on the glue to resemble a ghost's eyes and mouth.
Sprinkle the
glue with clear glitter, if desired, before aligning the remaining
ghost-shaped cutout and placing it on the
first. When the ghost has dried,
punch a hole in the top and suspend it from the ceiling with thread.
Pumpkin Book
Page 1 "Pumpkin, pumpkin big and round."
(fingerpaint a pumpkin, cut and glue on page with words)
Page 2
"I'm glad that you grow on the ground."
(cut
4 small pumpkins & add yarn vine on page w/ words)
Page 3 "I'm glad that you don't grow in a tree."
(trunk and fall leaves precut,
glue orange pumpkins w/ words)
Page 4 "'Cause then you might fall down on me."
(draw self with bump on head and pumpkin broken on the ground on page w/ words)
Jack-o-lantern Stamps
Use the cutouts from making a jack-o-lantern (eyes, nose, mouth) for pumpkin
prints just insert a
popsicle stick, dip them in paint, and use them as stamps.
You can docollages with the shapes, or have
the kids actually make the class'
jack-o-lantern face on a sheet of paper pre-cut in pumpkin shape.
Pumpkin Patch
Hard boil some eggs. Dye them orange (like you do with Easter eggs).
Cut paper towel tubes (not toilet paper
tubes) into smaller rings about one inch
in diameter. Decorate the rings with green paper or Easter grass.
Place the eggs on the decorated tubes.
Spider's Web
Materials Needed:
String or yarn,
6 6 in. pieces of string and 4 12 in. pieces of string,
diluted white glue or liquid starch,
dishes,
waxed paper
Directions:
Let the children dip pieces of string into dishes of glue or starch.
Then have them lay their strings on
waxed paper to create the spiders web.
Lay the string in the shape of a spiral overlapping the ends. Lay
the large
pieces of string over the spiral in the shape of a cross. When
the strings dry, they will become
stiff and hold their shapes.
Hanging Spider
Materials Needed:
paper plates
black construction paper, cut into long thin strips
scissors
glue
string
Directions:
Cut eight long strips of black paper and a circle for the spider's head.
Glue the two small paper plates
together, top to top, with the legs
and head placed between them. Paint the body black and glue a long
piece
of string to the middle of the back so the spider can dangle from the ceiling.
Spider Hats
Materials Needed:
Black and orange construction paper
glue
scissors
Directions:
Cut eight strips of black paper 1 1/2" x 9" 2. Cut one strip of black paper 2" x 22"
(you could substitute
two 11" pieces glued together). Cut the following:
Large black circles, medium orange circles, and small black circles.
Glue orange circle to edge of large black circle. Glue small black
circle to edge of orange circle. Measure the 22" piece around child's
head, overlap and glue ends together. Glue the eyes to the hat band
with
black eyes touching as shown. Fold the leg strips in half. Fold one
end of each leg strip back 1". Glue
the straight end to the inside edge of the
hat band. Fold and glue the remaining legs.
You will have four
legs on each side of your hat.
Fall Scarecrows
Place these cute little scarecrows on your porch to welcome all the trick-or-treaters!
Using a brown
grocery bag, cut off the bottom of the bag, then flatten the bag.
Fold in the corners, then staple. Stuff the
bag with newspaper, etc. and staple
the bottom closed. Turn the bag over and decorate with buttons,
markers,
crayons, construction paper, fabric scraps, and anything else you can think of.
Ghosts
Trace hands on white paper. Cut out hands and put a face on the ghost.
(FINGERS pointing down, wrist is top of
ghost). Cut a 1/4 a circle (or circle )
from yellow paper for the moon. Hold paper vertical. Decorate the
bottom of the
paper with a fence (brown), pumpkins. Take black construction paper and
glue moon up in
corner, fence on bottom and ghost up in the sky.
Playdough Fun
Let children assist you with making playdough. Add orange kool-aid powder
to dough. give children
Halloween cookie cutters to use with the
playdough.
Pipe Cleaner Spiders
Provide the children with pipe cleaners to make spiders. Have the children
twist the pipe cleaners together to form a body and legs.
Discuss how many legs a
spider has.
Balloon Jack-o'-Lanterns
Blow up an orange balloon and let the child use a black marker, stickers, or finger
paint to create facial
features. Ask the child how does the jack o lantern feel?
Paper Plate Jack-o'-Lanterns
Have your children paint a paper plate orange. When dry, have the child glue on
pieces of black
construction paper for the facial features. These pieces may be
cut with scissors or torn, depending on
your child's ability level. For older children,
try using glue to form the facial features and sprinkle glitter, or
various items
(i.e. buttons, beans, noodles, pebbles) on the glue.
Sponge Painted Ghosts
Cut out or buy ghost shaped sponges. You will need black construction
paper and white tempera paint
when showing the child how to dip the
sponges in the paint and press on the paper to make ghost prints.
Spider Paper Plates
Use a smaller and larger paper plate to make these spiders. Staple the
smaller plate onto the larger
plate, as if the smaller plate will be the
spider's head. Have the child paint both sides black. Then add
black streamers
for legs and white construction paper for eyes. Hang them from the ceiling.
Pumpkin Seed Art
Collect pumpkin seeds from inside a pumpkin. Let them air dry
and have the children use the pumpkin
seeds to make a collage.
Pumpkin Seed Shakers
You need: dried pumpkin seeds from inside your pumpkin, two paper
plates (for each child) and a stapler.
Have the children put some seeds
on one of the paper plates (bottom side down). Next, have them place
the other plate on
top of the first plate (bottom side up). Help the
children staple their plates together with the seeds inside. Let the
children
paint, use markers or crayons to decorate their shakers.
Fingerpainted Pumpkins
Give each of your children apiece of white butcher paper or construction paper.
In the center of each
piece of paper, place a spoonful of orange finger paint.
Let the children use their hands and fingers to
create designs with the paint.
When they have finished, allow their papers to dry. Then cut the papers
into pumpkin shapes and display them around the room.
Fingerprint Pumpkins
Have the children make orange fingerprints on a piece of paper.
Use a non-toxic orange ink pad. Show
the children how to use
one finger at a time. Use a green pen to draw stems on the paper
and draw vines
to connect some of the pumpkins. (You can do this for
younger children or have older children draw the vines and stems
themselves.)
Fingerprint Spiders
Have the children use a black non-toxic ink pad to make fingerprints on a piece of
paper. Have the
children draw on eight legs on their fingerprints to represent spiders.
Spider Web
Materials Needed:
Round Metal Cake Pan or Pie
Pan,
Black Construction Paper,
White Paint,
Scissors,
Marble.
Directions:
Cut a piece of construction paper to fit into the bottom of the
cake pan. Place one-half teaspoon of white paint in the middle of the paper.
Drop the marble into the cake pan and tilt the pan back and forth. As the
marble passes through the paint it leaves trails of white on the paper.
(I
have also had the kids glue plastic spiders on their pictures when dried!)
Spider Gum Drops
Supply the children with large black gum drops and eight toothpicks per child.
Have the children push the
toothpicks in the gum drops to represent the spiders legs.
Spider Webbing
Provide children with a chair and some yarn or string. Ask them to
create a spiders web by wrapping the
string around the legs of the chair.
Halloween Cookie Cutter Painting
Buy an assortment of Halloween cookie cutters. Let the children
dip the cookie cutters into paint and
then press onto paper.
Halloween Pasta Collage
Check out your local grocery store to find pasta in Halloween shapes. Let your
kids create a
cool collage with the pasta and whatever else you decide to add.
Paper
Chains
Cut orange and black construction paper into 1" by 5" strips.
Tape or paste one orange strip
into a ring. Thread a black strip through
the orange ring and paste or tape it closed. Continue
adding rings to
the chain, alternating the colors. When your chain is long enough,
drape it
across a doorway or window. Paste a Halloween picture
at each end of the chain where it is
attached
to the doorway or window.
You can also buy orange & black streamers at party
stores.
Popcorn Packaging Ghosts
Cut a piece of white heavy thread (such as fishing line) and tie it around
the popcorn about 1/3 of the way down to separate the neck from the body.
Pull
the string tight to scrunch in the popcorn. Then use a black marker
to make
eyes, mouth, and arms. String them onto a necklace.
Make a mobile or put on a
popsicle stick and make tiny puppets.
Boo Mask
A mask that a child can hold up to his face and remove when desired.
Eyes
look through the O's in BOO. Cut out of black paper.
Add popsicle stick handle
and colorful streamers on the side.
Paper Bag Pumpkin
Using a large grocery bag (or a little lunch bag) crumple
newspaper and stuff.
Twist top of paper bag and tie with elastic. Have children paint
the bag orange. Paint the face black. Paint stem green.
Finger Paint Pumpkin
Put blobs of red and blobs of yellow finger paint on pieces of shiny white
finger paint paper. If you do not have finger paint, you can use tempera
Add a
small amount of liquid starch to thicken and brighten the tempera.
Let the
children finger paint all over the paper, noting the different shades
of orange
made. Let the papers dry. Cut out the biggest pumpkin shapes
possible from the
painted papers. Encourage the children to
draw their own scary, happy, or silly
faces on them.
Use as suggested in the Bulletin Board Idea below to create a pumpkin patch
mural.
Pumpkin Patch Bulletin Board Idea
Make a class pumpkin patch mural. Have each child make a finger paint
pumpkin.
Trace a large, simple oval shaped leaf on green construction paper for
each child
and let the children cut out their own leaves. Mount the pumpkins on
your bulletin
board. Make the vines by twisting lengths of green crepe paper
streamers and
stapling them to the bulletin board. Staple the leaves on the
vines,
arching them for a three dimensional effect.
Seed Scenes
Dye pumpkin seeds in a mixture of one cup of water, one teaspoon of vinegar,
and
several drops of food coloring. Dry them overnight on a paper towel. Let the
children
glue the seeds on dark sheets of construction paper to make mosaic
collages.
Make-a-Face Pumpkins
Make a several large pumpkins from cardboard that has been
painted orange.
Give the children an assortment of geometric
paper shapes. Let them use them to
create a variety of jack-o’-lantern
faces on the pumpkins, different ones each
time they play!
Pumpkin Patch Picture
Materials
Needed:
Cotton Balls, Orange Paint Powder, Pie Pan,
Brown Construction Paper, Green
Yarn, Yarn.
Directions:
Put the paint powder in the pie pan. Roll the cotton balls
around in the paint and then set aside. Spread glue onto the brown
piece of
paper. Put on the orange cotton balls (pumpkins) and the
green yarn (vines).
Or you can also just use orange pompoms.
Witches Broom
Paper Grocery Bag, Paper Towel Rolls, Scissors, Tape, String. Depending on
the length you want the broom handle to be, you can tape two or more paper
towel rolls together. Cut off the bottom of the paper grocery bag, then cut
fringes into that side. Roll the uncut side of the paper bag around the
bottom of the tube; attach with tape, then tie with string.
Pumpkin Seed Pictures
Dye
pumpkin seeds many colors. Place the seeds with paste and
paper on a table in the art area. Have children create their own pictures.
Pre-K Fun Theme Pages are
for educational reference only!
No copyright infringement is intended.
I do not claim any of these as my own ideas.
They are shared from friends and fellow group
members.
Thanks for sharing all your great ideas!
|